Adding New Documents
Articles in this Topic
| Add A Document | Mandatory Properties |
| Document Details | Add Document Content |
| Document Title | Document Properties |
| Link Form Submissions | Watch the video |
Add A Document
To add a new Document, from the Workspace My Work menu select New Document.
This opens the New Document window on the 'Entity Extraction' page which is where the Document information is added.
The basic steps to complete for a new Document are;
- Complete any Mandatory Properties shown
- Complete the Document Details in the left pane.
- Add the Document Content and a Title in the middle pane.
- Save the new Document.

Mandatory Properties
Where Document properties have been set as mandatory, the 'Properties for New Document' window shows over the top of the new Document.
Complete all mandatory properties by either selecting the appropriate value from the list provided (or adding in the required detail if no list provided) for each Property shown and Save.

If no mandatory properties have been set then the full New Document window shows.
Document Details
Complete the Document Details in the left panel of the new Document;
- Department - Select the Department the Document belongs to (if different to the default one shown).
- File Name - Select the File the Document is to belong to (if different to the default one shown).
- Document Number - a unique Document number is auto-generated once the new document is saved.
The Year and month showing form part of the final number. - Type - Select the Document Type (if different to the default one shown).
- Event Date -Record the date of the Event the Document relates to (optional).
- Created On - Date defaults to 'today' which is editable (but cannot be a future date).
- Source - Record the source of the information in the Document (optional).
- Source Reliability - Select the source's reliability rating.
- Information Reliability - Select the reliability rating of the information in the Document.
- Owner - Defaults to the current User (or select from the list of available users).
- Security Level - Select the appropriate security level for the Document (if different to the default one shown).
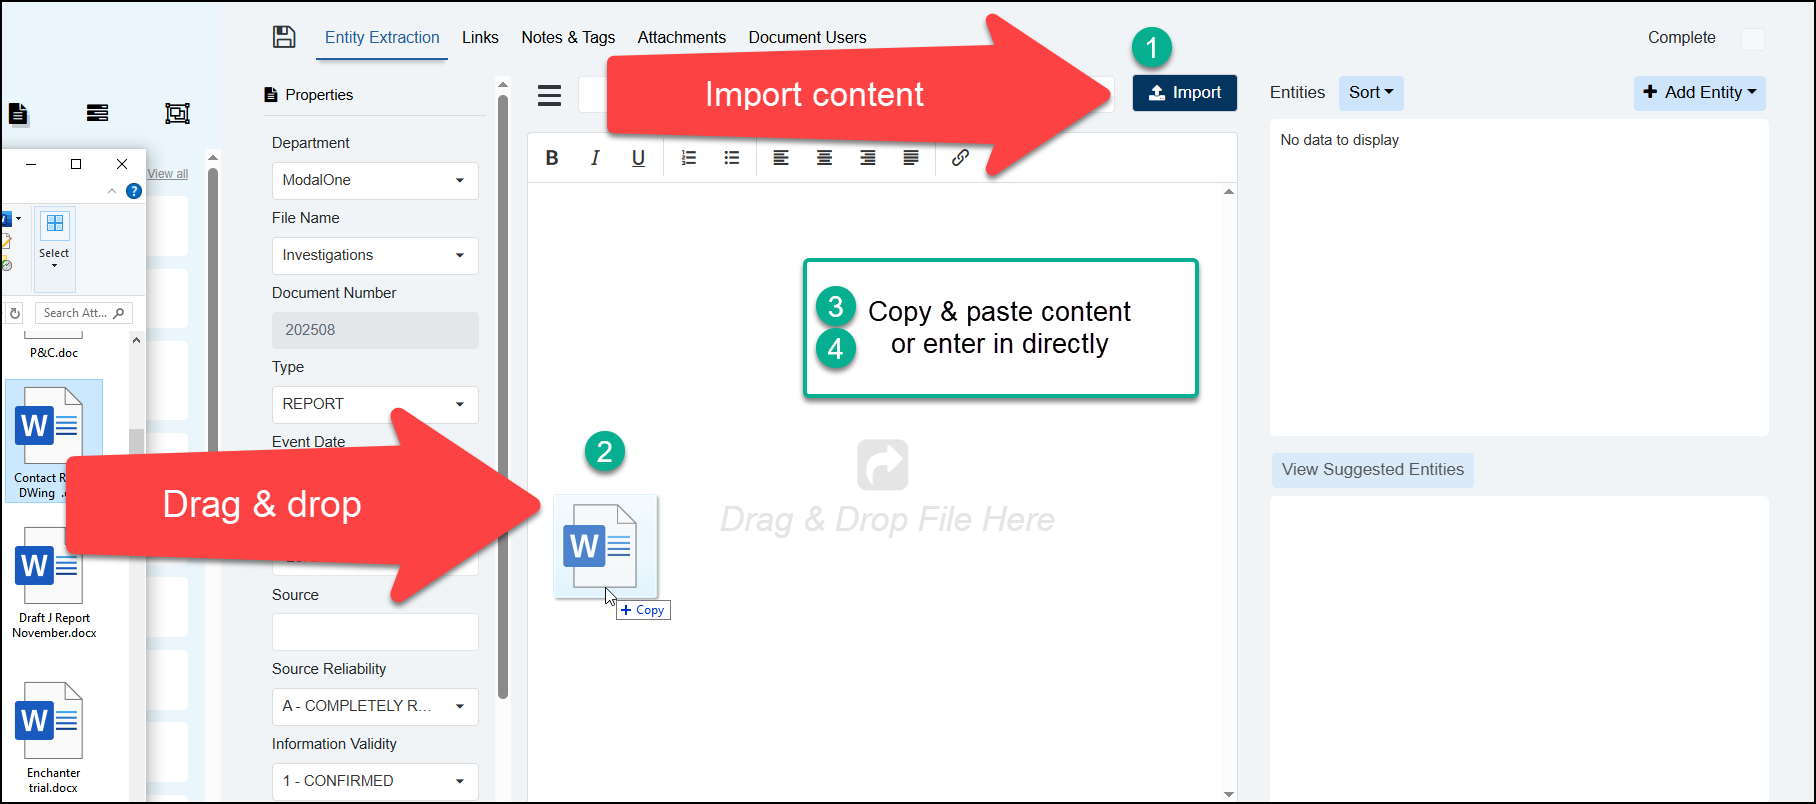
Add Document Content
The middle pane of the Entity Extraction window is where the content of the Document can be added by the following methods.
- Import - click the Import button to browse your Files and select the required document file. File types supported are .doc,.docx, .msg,.pdf,.txt,.csv, .xls,.xlsx. jpeg, jpg, bmp, png.
- Drag & Drop - click on the Document / File from your device and drag & drop this into the Content pane.
- Copy & Paste content in (using Ctrl+V for the paste).
- Manually add content by recording text directly into the Content field.
Placeholder Documents can be added/saved without content, if this feature has been enabled by your Organisation. Content can then be added at a later date when available. A placeholder Document must contain a Title and the required details e.g Department, File, Owner.
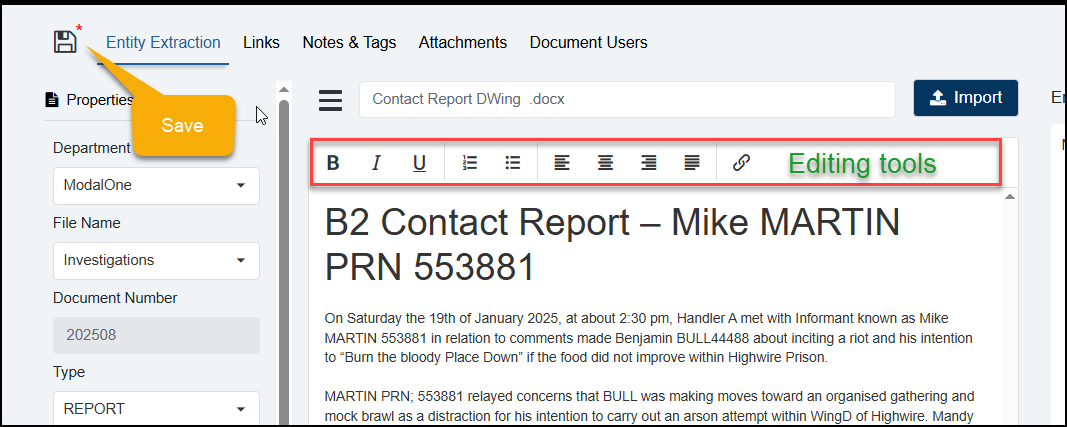
Content can be formatted using the editing tools or Links created or added either before or after saving the Document. Note that the auto-saved Attachment will not include any format changes as it retains only the original file.
Insert a link - 1: click the Link icon from the editing tools, 2: add the URL and the text to display for the link and click OK

Note:
Scanned document. If the source document content was an image or scan saved as or within a .doc,.docx, .msg,.pdf,.txt,.xls,.xlsx the text content cannot be extracted and a message may show in the content " "Unable to extract content of the file. Check that it is represented as text (not image) and has a correct format". The content may be saved as an Attachment of the Document. In the Content, only the 'Unable to extract...' message will show. The content can be edited to add or copy & paste text (not text within an image) in, e.g Entity details in order to add Entities. Note - save the Document if adding\ pasting Entity content in to enable identification of Suggested Entities.
If the content added is an image file jpg, png, jpeg,bmp, it can be saved as content (unless identified as 'unsafe' or exceeds the size limits) however it is not automatically saved as an Attachment (a copy can be added\uploaded directly on the Attachments page).
The Details for creating Entities will need to be manually added into the Content (on the Entity Extraction page) to enable suggested entity identification or to extract Entities.
Encrypted file-docx/PDF can not be uploaded. To enable upload, an unencrypted copy of the file will need to be made or encryption will need to be removed via either Adobe acrobat or other external software before importing.
Document Title
Where the content is imported or added via drag & drop, the Document Title populates with the File name (excluding image files). The Title can be edited and it is recommended to remove the File type detail that is appended on the end eg .pdf.docx.msg etc.
If copying and pasting content or manually inputting content or creating a placeholder Document, enter a Title for the Document.
If processing a LiNK form, enter a Title for the Document otherwise will save with a Title of 'New Document'.
Save Document
Once the details, Title and Content have been added - click Save from above the main Editing menu to save the Document. Once the Document has been saved, Suggested Entities can be identified.
Auto Attached - The Document content (from imported or drag & drop content) is also automatically saved as an Attachment to the Document.
If a message shows "There are validation errors which should be fixed before saving" check that a Title has been entered, or the Department and File details selected.
Tip: Whenever a red asterisk shows alongside the Document Name at the top of the page there is unsaved data.
The Document is automatically saved when navigating to another page within the Document e.g Links, Notes & Tags or Attachments.
If navigating away from the Document a prompt shows if content has not been saved.
Document Properties
Additional to any mandatory Properties, further Properties can be added (optional or as recommended by your Organisation) by clicking on 'Properties' at the top of the Details pane. Note - mandatory Properties cannot be deleted but may be edited.
From the Add Property list select any additional Properties required and record or select the property detail/value.
If the Document was created by processing a LiNK form then some Properties may be pre-populated.
Click Finish in the Properties pane to Save any newly added or edited Properties.
Link Form Submissions
When LiNK form submissions are processed they open as a new Document with the information submitted showing in the Document Content pane. Any mandatory Properties will need to be completed. Some of the Details will be pre-populated and others will need to be reviewed and completed.
A Title will need to be added otherwise only a default title will show as 'New Document'.
Default Properties are automatically added when the Document is created via a LiNK form submission and can be reviewed and added to after the Document has been saved.
What's next? Once a new Document has been saved, edits can be made to the content and Entities, links, attachments, notes and tags added to the Document.
Recommended next Topic - Adding Entities
Related Articles - Review LiNK Forms
Watch the video
Viewing Tips
To view a video at full screen, click on the 'Full screen' button.
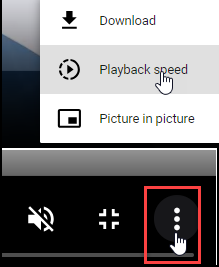
To adjust the playback speed (decrease or increase) click on the 3 dots and select Playback speed.
Captions display best if the mouse or touch-pad are not moved or engaged once playing.
Videos have no audio.

| Add a new Document | |